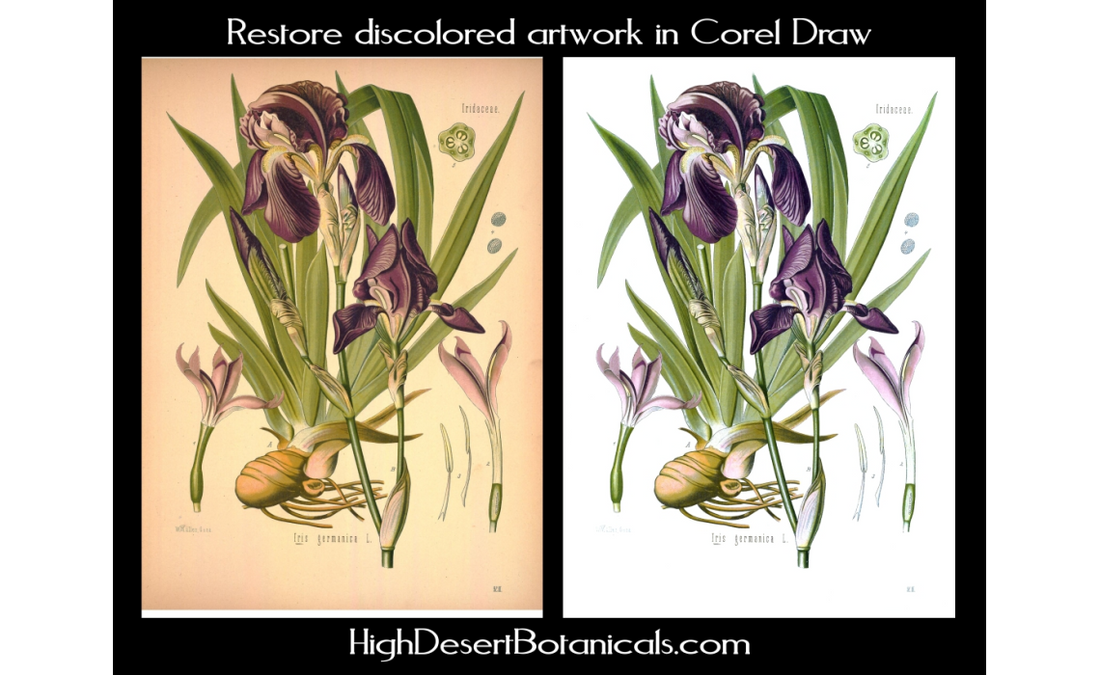
I'm a big fan of the old style of botanical illustration. Sadly, many of the older botanical illustrations were painted or printed on paper that has yellowed or discolored in some fashion, muddying the colors of the original illustration. With a lot of tinkering, I've come up with a method to remove the yellow color from scanned images while preserving the original colors. I started with images from Franz Eugen Köhler’s Medizinal-Pflanzen, downloaded from plantcurator.com. When I first started trying to restore the color in these images, I adjusted the hue, white balance, contrast, etc, but was never happy with the results. Using the replace color tool only removed the discoloration from the unpainted areas of the page, leaving the painted areas muddy looking. The biggest hurdle I found was that the discoloration of the paper was not uniform; when one area of the page looked right, other areas still looked bad.
When I finally figured out the right sequence of steps, I was astonished at the result. I think I just sat at my computer with a goofy grin on my face for a few minutes. Unlike other methods that use incremental steps to approach the final product, this process doesn't change the image substantially until the final step. The sudden transformation from muddy yellow to crisp white is sort of magical. In a case like Köhler’s Medizinal-Pflanzen, where several pages are discolored in the same way, you can apply the same filter to each image without repeating a lot of the work. Even if the filter is a little darker than the discoloration, it should still work just fine.
For this process to work, you need a document that has relatively smooth discoloration, the more variable the discoloration is, the more work it is to create the filter.
1. Create a Corel Draw document big enough to hold two copies of the image you want to clean up. Import the image and place it on one side of the page.
2. Draw a rectangle the same size as the image on the other side of the page.
3. Color the rectangle to match the paper color of the image. This is the most time-intensive part of the process. For the example images, the page is yellow-tan in the center and pinkish around the edges. I used an elliptical fountain fill with the dropper tool to mimic the colors of the paper. Another method for more complex discoloration is to create a mesh fill and use the dropper tool to set the colors at the nodes to match the paper colors. The colors can be adjusted later if the filter doesn't look right.
4. Drag the rectangle over the image, use the object manager to rearrange the order if the rectangle is behind the image.
5. In the Object Properties, select the Transparency tab then pull down the menu where it says Normal and select Divide.
6. Stare in disbelief.
7. Drag the now transparent filter rectangle off of the image. Go find someone you want to impress and bring them to your computer. Drag the filter rectangle over the image and watch their reaction.
8. Export the restored image.
9. If the result is not quite right, simply remove the transparency setting, adjust the color of the filter rectangle to better match the paper color, and repeat step 5.